What’s better than a decadent dessert? A stunning, fancy dessert that doesn’t leave you with a mountain of dishes to scrub. I love to eat dessert first as much as the next person, but my love for sweets treats has always been tempered by my absolute loathing for the cleanup that follows.
That’s why I’m obsessed with recipes that deliver maximum flavor with minimal mess. Today, we’re making a show-stopping Lemon Tart Lilac Meringue. It sounds intricate, but I’ve streamlined the process brilliantly.
This recipe proves you can create elegant mini desserts without sacrificing your entire evening to the sink. We’re talking about a truly clever approach to tart recipes that keeps the dish count astonishingly low.
Recipe Overview
This is the kind of dessert that looks like you spent all day, but the secret is in the smart, efficient assembly. Let’s get the key details out of the way.
- Cuisine: French-Inspired
- Category: Dessert
- Prep Time: 25 minutes
- Cook Time: 20 minutes (plus cooling)
- Total Time: 45 minutes active
- Servings: 8 mini tarts
The Magic of a One-Pot (or One-Pan) Meal
Okay, full disclosure: we’re using one saucepan and one mixing bowl as our main heroes. For a dessert this fancy, that’s practically a miracle.
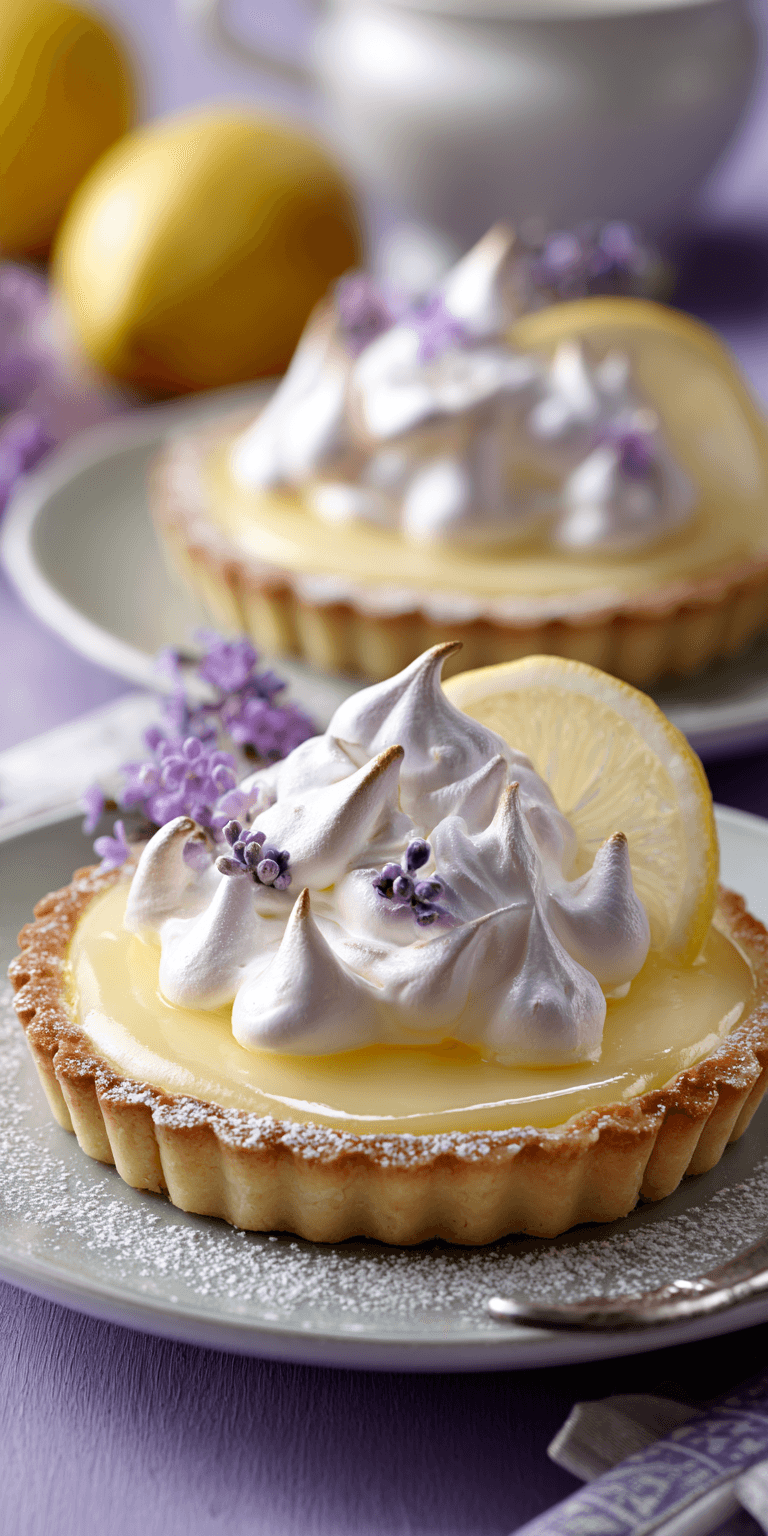
Lemon Tart Lilac Meringue Recipe
The Full Ingredient List
My “Less Mess” Cooking Method (Step-by-Step)
Notes
Enjoy your homemade Lemon Tart Lilac Meringue Recipe!
The magic is in the sequence. You’ll cook the luxurious lemon curd in one pot. Then, you’ll use that same pot’s residual heat to help bloom the edible lilac color. Your mixer bowl handles the meringue. It’s a symphony of beautiful efficiency.
All You Need (One Pot & These Ingredients)
Beyond your trusty saucepan and mixer, the ingredient list is straightforward. The “lilac” comes from a totally natural source, which is my favorite kind of kitchen trick.
The key is using a good quality, ready-made mini tart shell. It saves time and eliminates the need for extra pie-making tools. We’re all about that shortcut life when it tastes this good.
The Full Ingredient List
- 8 pre-baked mini tart shells (3-inch)
- 4 large egg yolks (save the whites!)
- 1/2 cup fresh lemon juice
- 1 tbsp finely grated lemon zest
- 3/4 cup granulated sugar
- 1/4 tsp salt
- 6 tbsp unsalted butter, cubed
- A few drops natural blueberry juice (for lilac color)
- 4 large egg whites, at room temperature
- 1/2 cup superfine sugar
- 1/4 tsp cream of tartar
- 1 edible violet or lilac flower for garnish (optional)
My “Less Mess” Cooking Method (Step-by-Step)
Follow these steps in order, and you’ll see how the cleanup just… disappears. The goal is to keep everything moving with minimal equipment swaps.
- First, separate your eggs. Put the yolks in a medium bowl and the whites in your impeccably clean stand mixer bowl. Set both aside.
- In your medium saucepan, whisk together lemon juice, lemon zest, granulated sugar, and salt. Heat over medium, whisking, just until the sugar dissolves. This takes about 2 minutes.
- Whisk the egg yolks in their bowl. Very slowly, drizzle about 1/3 of the warm lemon mixture into the yolks, whisking constantly. This tempers them so they don’t scramble.
- Pour the tempered yolk mixture back into the saucepan with the remaining lemon mix. Cook over medium-low heat, stirring constantly with a silicone spatula, until it thickens enough to coat the back of a spoon (about 5-7 minutes).
- Remove the pot from heat. Stir in the cubed butter until fully melted and incorporated. Now, add a few drops of blueberry juice and stir. The heat will turn it a perfect, soft lilac. Pour the curd into a clean bowl to cool slightly.
- While the curd cools, use your stand mixer to beat the egg whites and cream of tartar on medium-high until soft peaks form. Gradually add the superfine sugar and beat until stiff, glossy peaks form.
- Spoon or pipe the warm lemon lilac curd into your tart shells. Then, immediately top with generous swirls of the meringue. The slight warmth helps them bond.
- Use a kitchen torch to toast the meringue peaks until golden. If you don’t have a torch, you can briefly broil them, watching closely. Garnish with an edible flower if desired.
Pro-Tips for Perfect One-Pot Cooking
These little hints make the difference between a good dessert and a great one, all while keeping things clean.
Always use a heavy-bottomed saucepan for the curd. It distributes heat evenly and prevents scorching. A scorched pan is a nightmare to clean.
Have all your ingredients measured and ready (mise en place). This prevents frantic, messy searches mid-recipe. It’s the ultimate time and sanity saver.
When making meringue, ensure your bowl and whisk are completely grease-free. Any fat will prevent the whites from whipping up properly, leading to a kitchen fail and wasted ingredients.
Storing & Reheating (Easy!)
These mini lemon tarts are best enjoyed the day they’re made. The meringue is at its peak then.
If you must store them, place them uncovered in the fridge for up to 4 hours. For longer storage, keep the curd-filled tarts and meringue separately, assembling and torching just before serving.
Nutrition Notes
Let’s be real—this is a decadent dessert. It’s a treat. But here’s a basic breakdown per mini tart.
- Calories: ~320
- Fat: 16g
- Carbohydrates: 42g
- Sugar: 32g
- Protein: 4g
Your One-Pot Questions, Answered
I know you might have a couple of questions before you start. Here are the most common ones.
Can I make the curd ahead of time?
Absolutely! The lemon lilac curd can be made up to 3 days in advance. Just press plastic wrap directly onto its surface and refrigerate. Let it come to room temperature before filling the shells.
What if I can’t find natural blueberry juice?
No problem. A tiny, tiny drop of purple gel food coloring works. Or, you can skip it entirely for a classic, sunshine-yellow lemon meringue tart. It will still be delicious.
Any substitute for cream of tartar?
You can use an equal amount of fresh lemon juice or white vinegar. The acid helps stabilize the meringue and gives it volume, which is absolutely crucial for those beautiful peaks.
So there you have it. A dessert that looks like it came from a patisserie but leaves your kitchen looking like you just meditated instead of cooked. It’s the ultimate win for those of us who believe in eating dessert first and doing dishes… never.
I hope this recipe brings a little elegant joy to your table without the dreaded cleanup. Now go enjoy all that flavor (and your clean kitchen!). Let me know how it went by leaving a comment and rating below!