
Is there anything more frustrating than hearing “I don’t like that” before the plate even hits the table? I feel you. We’ve all been in the dinner-time trenches, trying to find one single thing that pleases everyone.
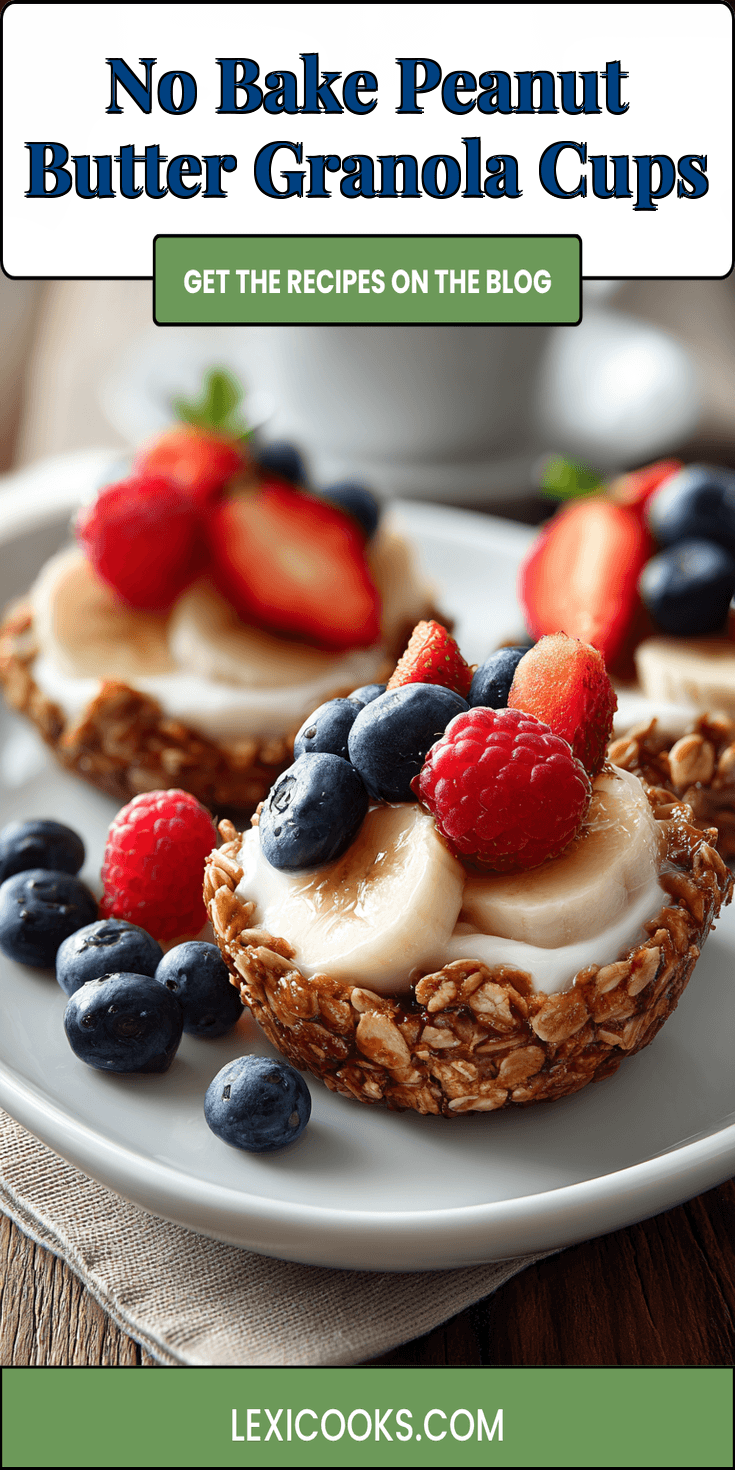
That’s why I’m so excited to share our recipe for No Bake Peanut Butter Granola Cups. They are my secret weapon. They’re a snack, a dessert, and a breakfast all in one cute little package. And the best part? Zero oven time means you can make them on even the most chaotic afternoons.
Think of them as a healthier, homemade version of a peanut butter cup, but with a fun, crunchy twist. They’re perfect for satisfying that sweet tooth without a big sugar crash. Let’s get into it!
Recipe Overview
- Cuisine: American
- Category: Snack, Dessert, Breakfast
- Prep Time: 20 minutes
- Cook Time: 0 minutes
- Total Time: 20 minutes (plus 1 hour to chill)
- Servings: Makes 12 cups
Why Even My Picky Eaters Love This!
I’ve learned that presentation and choice are everything. These granola cups are a total win on both fronts.
First, they’re individually portioned. For some reason, food in its own little cup is just more fun to eat. Second, they are wonderfully customizable. Kids love having control, so letting them pick their own toppings is a game-changer. The base is a familiar, friendly flavor of peanut butter and honey that most kids already adore.
No Bake Peanut Butter Granola Cups Recipe
Our Family-Friendly Ingredient List
The Full Step-by-Step Instructions
Notes
Enjoy your homemade No Bake Peanut Butter Granola Cups Recipe!
Our Family-Friendly Ingredient List
I keep my pantry stocked with these basics. You probably have most of them already!
- 2 cups old-fashioned rolled oats (use certified gluten-free if needed)
- 1/2 cup creamy peanut butter
- 1/3 cup honey or pure maple syrup
- 1/4 cup melted coconut oil or unsalted butter
- 1 teaspoon pure vanilla extract
- A pinch of salt
- For the filling: More peanut butter, melted chocolate chips, yogurt, or fresh fruit!
How to Get the Kids Involved in Cooking This
This is a fantastic “first recipe” for little helpers. My kids fight over these jobs!
Measuring Master: Let them measure and pour the oats into the big bowl. It’s a great way to practice those early math skills.
Topping Captain: Once the cups are formed and chilled, set up a topping station with mini chocolate chips, rainbow sprinkles, or banana slices. Give them the spoon and let them decorate their own.
The Full Step-by-Step Instructions
Don’t let the steps fool you—this is incredibly simple. I promise!
- Line a 12-cup muffin tin with paper or silicone liners. This makes cleanup a breeze.
- In a large mixing bowl, combine the oats and the pinch of salt. Stir them together.
- In a medium, microwave-safe bowl, combine the peanut butter, honey, and coconut oil. Heat in 30-second bursts, stirring in between, until it’s melted and smooth. This usually takes about 60-90 seconds total.
- Stir the vanilla extract into the warm peanut butter mixture.
- Pour the wet ingredients over the dry oats. Use a big spoon or spatula to mix until every single oat is coated and shiny.
- Scoop the mixture evenly into the 12 muffin cups. Now, use your fingers, a small spoon, or the bottom of a shot glass to press the mixture firmly into the bottom and up the sides of each liner, forming a cup shape. Pressing it well is the key to them holding together!
- Place the whole tin in the refrigerator for at least 1 hour to set and become firm.
- Once set, fill them with your favorite toppings! We love a dollop of peanut butter with a few chocolate chips, or a spoonful of Greek yogurt with berries.
Fun Twists for Different Tastes
This recipe is like a blank canvas. Here’s how we mix it up to please everyone at the table.
For the Chocolate Lovers: Stir 2 tablespoons of cocoa powder into the oat mixture before adding the wet ingredients. You’ve just made chocolate peanut butter cups!
Allergy-Friendly Swap: Use sunflower seed butter instead of peanut butter. It works perfectly and has a similar color and texture.
Add Some Crunch: Mix in 1/4 cup of crushed pretzels or rice cereal with the oats for an extra fun texture.
Fruity Version: Fill the set cups with a spoonful of strawberry jam or apple butter for a pop of fruit flavor.
Storing & Reheating (Perfect for Busy Nights)
This is the real parent hack. Make a batch on Sunday and you’re set for the week!
Keep the finished cups in a sealed container in the fridge. They will stay perfect for up to 5 days. You can also freeze them for up to 2 months in a freezer bag. Just thaw in the fridge overnight or for a few minutes on the counter.
There’s no need to reheat! They are meant to be eaten cold, straight from the fridge. It makes them the ultimate grab-and-go snack.
Nutrition Notes
While these are a treat, I feel good about the ingredients. Here’s a quick breakdown of what’s inside (nutrition will vary with toppings).
- Energy Boost: Oats and peanut butter provide protein and fiber to help keep energy levels steady.
- Healthy Fats: From the peanut butter and coconut oil, which are great for growing brains.
- Natural Sweetness: We’re using honey or maple syrup instead of refined white sugar.
- Customizable: You control the toppings, so you can keep it light with fruit or make it a more decadent easy dessert.
FREQUENTLY ASKED QUESTIONS
Can I make these without peanut butter?
Absolutely! Any nut or seed butter will work. Almond butter, cashew butter, or sunflower seed butter are all great choices. The flavor will change slightly, but the method stays exactly the same.
My mixture seems too dry/crumbly. What did I do wrong?
No worries! This is common if your peanut butter is very thick or you measured the honey a little light. The fix is simple. Just add another tablespoon of melted coconut oil or honey and mix it in. It should come together nicely.
Are these like a moist homemade carrot cake?
They have a different texture! Carrot cake is soft and, well, cakey. These granola cups are meant to be crunchy and chewy, not moist and fluffy. They’re more like a handheld granola bar in a fun cup shape. If you’re craving that classic carrot cake flavor, that’s a baking project for another day!
There you have it! Our family’s favorite no-fuss, no-bake treat. They have saved me from the “I’m hungry” whines more times than I can count.
I love how something so simple can feel so special. It’s a recipe that gives you a break from cooking while still giving your kids something homemade and delicious. I hope it brings a little peace (and yumminess) to your kitchen, too.
I’d love to know if this was a hit with your family! Did your kids pick a favorite topping? Please leave a comment and rating below!